Showing posts with label Free Quilt Pattern. Show all posts

Friday, February 2, 2024

Fabric Love and Free Pattern Friday


My Wordless Wednesday photo 
showed my recent quilty indulgence purchase
of the Tilda Jubilee Fat Quarter Bundles.
I bought mine at Handcock of Paducah on pre-order 
to add to my Tilda Collection.
The small print bundle has a print with a green background.
The main collection only has green in the leaf details.

As I love green, I went stash spelunking deep in my closet
and pulled out some of my older Tilda Collection gems.

These greens are from the Apple Butter Collection 
and are a nice addition to the Jubilee colors, I think.

I love the way almost all Tilda Collections play well together.

Jubilee is their 25th Collection and Tilda is celebrating. 

Jubilee Collection Catalogue Here

There are, of course, some lovely new free patterns. 


This lovely applique quilt is my favorite.

It is much too challenging for my skills at this time ...

maybe forever.

Here is the link to just the pattern templates.

But I love to save the patterns and look.

The applique pillow might be within my possibility.


This pieced pillow is much more of a possibility for my capabilities. 


It has been added to my very long list of "Things To Sew."

Time will tell. 

Will you celebrate their Jubilee and sew?


Friday, April 14, 2023

Friday Focus ~ Moda ~ Free and Not Free


Moda Fabrics ~ Sew Sweet

Moda fabrics are wonderful and they generously release many free patterns,

such as this 


Flag of Valor Quilt by Minick & Simpson

which features many of the Belle Isle fabrics gathered in my above photo.

There are many, many, many more wonderful freebies in the link below: 

Free Patterns from Moda Fabrics

Moda Fabrics also hosts many free quilt-alongs.

Here are a few of the Quilt-Alongs in 2023,

some may require purchase of book or pattern:

Quilt~Along with Moda 2023

One of these is the 


Summer Memories Quilt Along @ FQS

that I featured last week. 

The photo at the top of the page is the fabrics choices

 that I have now assembled for this quilt-along.

The border print is from  


Belle Isle by Minick & Simpson for Moda @ FQS

My choice of background fabric is from

 Eyelet by Fig Tree for Moda @ FQS

This is my current fabric pull for the Summer Memories QAL.

The large print border rose fabric is from Belle Isle.

The blue plaid and red flower and flag motif

are my choices for sashing and post fabrics,

which are also from Belle Isle.

The other fabrics range from Corey Yoder to Lori Holt

 to Fig Tree and Bonne and Camille and more.


My sewing machine is still idle and under cover

while my sewing corner is under reconstruction,

but I am dreaming o summer quilts.

Today we also had summer heat.

The temperature locally soared to 89 degrees F.

That is hot for April in New England!


May you have a safe and happy quilty weekend!


Wednesday, September 2, 2020

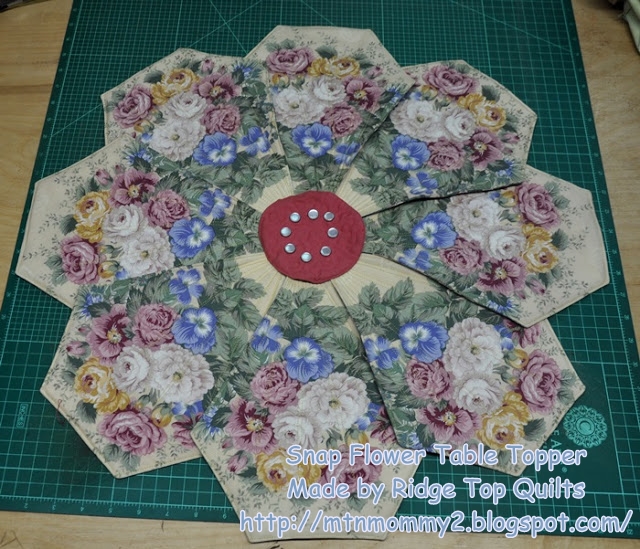
My Snap Flower Table Topper Tutorial ~ Free on Google Docs


This is my original Snap Flower Table Quilt.

I designed and posted this table topper

The idea is that you can unsnap the individual petals and use them as snack mats
so you always have something ready at your fingertips 
on which to set your mug or plate.

For awhile the pattern was in my Craftsy Store, 
bu it was removed when this website changed.
I miss the old Craftsy site, where small designers could share their 
patterns for free and for profit.
I have no aspirations o become the next big quilt designer.
I enjoyed my little bitty spot.


My dear friend, 
recently asked me for the tutorial and made this lovely version.
I never would have thought to use a large scale floral print in  this manner,
but I love the look of this topper.
Dorian used the snaps she had on hand,
not the newer plastic ones that I use.
Any snaps will work, really.


I have uploaded the revised tutorial for this table quilt to Google Docs.


I would love to see your version if you make this pattern.

Happy Sewing!


Tuesday, February 25, 2020

Honey Buns & Free Pattern Fun


This Mini Moda Honey Bun has been in my stash for a long time.

I have no idea how it came to be in my stash.
This is not a precut size that I recall ever buying.

Honey Buns are collections of 1 1/2" x 42" strips of fabric produced by Moda Fabrics. 
Honey Buns typically include 40 strips of fabric but can vary,
like my mini roll which has 20 strips.

This little honey bun came out of my stash for a photo today
because I saw this cute 


Free Quilt Pattern that is made using a Honey Bun Roll.


For fun, I did some window shopping for fresh Honey Buns

@


and found quite a few tasty fabrics that I would like to see in this pattern.
including the
shown in the free pattern.

I think I would use a different line, though. 

Of course, I could also just sew my stash
and use the mini bun
or cut 1.5" strips from my stash.

The pattern looks like a good  choice for a "Stash Buster" quilt.

I am not buying fabric today but it is fun to look.

Which one would you choose?

~~~~~~~~~~~~~~~~~~~~~~~~~~~~~~
Edit 2/26/2020


Just saying ... ;) 
~~~~~~~~~~~~~~~~~~~~~~~~~~~~~~~~~~~

Thursday, September 6, 2018

A Quilty Birthday!


Happy Birthday to Me!

I am celebrating my 66th 
and
I am officially retired today. 

This nifty quilty gifty arrived a few days ago from my BFF online quilty friend,


and I saved it to open today with my morning coffee. 

Dorian knows me so well ... that I love vintages sewing machines,
butterflies and pretty colors like these lovely hand dyes. 


This panel is sew sweet!

It features four different antique sewing machines.

It is from the 


There is a free pdf. pattern for this fabric line.


The hand dyed and butterfly fabric would be a good addition to this design.

Thank you, my dear friend, Dorian !


Tuesday, February 9, 2016

Playing in New Snow with my Snowman Quilt!


It snowed again here yesterday and last night.

I ventured out when the sun attempted to break through the winter gray
to  play in the snow  with my


and to see if I could get a better photo of my quilt.

This photo may be better but it does not really show the crisp whiteness on black.

I love this quilt! 


I had a question from a reader about the quilting on this quilt.

So here is what I did: 

First I  trimmed the quilt square and sandwiched it.

I smooth the top and backing fabric to the batting from the center to the all the edges.

I press it lightly being careful to not touch iron to the batting.

I do not use pins.

I never pin, even for large quilts.


 I stitched in the ditch along the long seams where the blocks meet
then around the inner border,
then around the outer edge 1/8" of an inch from the edge of the top.
Then I went back to fill in the rest of the quilting ...


I quilted with my walking foot around the logs in the blocks from the outer strips inward.

It would have been hard to quilt the center square with the buttons on without this heavy duty  foot that I could lift over the buttons.

In retrospect, it might have been easier to sew the buttons on after the quilting was completed,
but I enjoyed seeing the happy snowmen faces while I worked and stitching buttons on though the batting may have been difficult for my hands.


I added the "snowflakes" with my walking foot.

I stitched forward and back through a center point in three lines to make six points.


Here is the quilting on the blocks.


For the border,  I added some snowflakes to the wheel design in the print.

Then with my walking foot I added long wavy lines around the snowflakes to suggest swirling snow.

So this was quilted entirely by my walking foot.


The backing fabric is a bold black and white zig zag  from  Caleb Gray

The binding is the same solid black as the night sky in the snowmen block centers.

This quilt measures 41" square finished.

The perfect size for a WOF backing.


Did I tell you how much I love this quilt?

For all the step by steps of how I make this quilt.


If you sew, please share you quilt with me!


Linking up today with all the beautiful quiltiness
@

Fresh Poppy Design


:) 

Sunday, February 7, 2016

Raggedy Heart Quilt Tutorial


This is how I made my Raggedy Heart Rag Quilt


I drew up a basic layout on EQ to plan my quilt.

This quilt is seven squares in seven rows.

Block squares are cut at 9" by 9"

Seam width is 1"

The finished quilt measures about 51" square.


I used a flannel square for the "batting" in my quilt.

You need 147 nine inch flannel squares for this quilt.


I cut a 6 inch heart template from freezer paper.


Pressed onto a double layer of red flannel.


Cut pairs of hearts, wrong side of fabric together, to sew onto seven of my flannel squares.

Except for the Minnie Mouse fabric which I purchased specially for my granddaughter,
I used a stash of fat quarters, small cuts and yard pieces of flannel fabrics from my stash.

I cut my squares at 9" to get the most squares 
from the FQs and Yard pieces.


You can cut FOUR 9" squares from a FQ.


You can cut FOUR 9"  WOF strips from a yard of fabric,
stack them and cut SIXTEEN 9" squares.

Katiniss was my ever present quilty helper and inspector.


Katniss and I made 49 sets of squares.


I also kept a stack of 49 single layer squares
(shown in the upper left of photo)
to use for "batting" in the blocks.

That is Katniss' tail in the upper right corner as we moved off to the sewing machine.


Sew a line of stitches from corner to corner through all three layers.


Turn block a sew corner to corner again.


This "X" is your quilting as you go.


I sewed a pair of red hearts onto the center of seven squares,
making a 1" seam.


Then I snipped at 1/2" intervals around the heart.

Spring loaded scissors with short blades are the best I have found for this snipping.


Make 7  raggedy heart blocks,


Make 42  plain quilted squares


layout in seven rows of seven squares


Since this quilt will get many, many washings and needs to be sturdy and long-lasting,
I used my heaviest duty cotton, King Tut, 40/3ply for piecing this quilt


I set my Janome on a long stitch to go though all the layers and make strong even stitches.


Sew the blocks together into rows.
You will be stitching through six layers of flannel here.


I made 1" seams so I could snip 3/4 inch deep cuts for the rag edges.

You sew these blocks together with the back of the blocks facing each other.


When sewing the heart blocks into the quilt, I made sure I did not catch the edges of the hearts.

You can see the "stand up" seam on  the top of the quilt on the left here in this photo.


Katniss and I laid out the rows.


When sewing the rows together, match corners and sew over the rag edge on the top of the quilt.


Another look at sewing the rows together.


This is what the top of your rag quilt will look like before your snip, snip, snip.


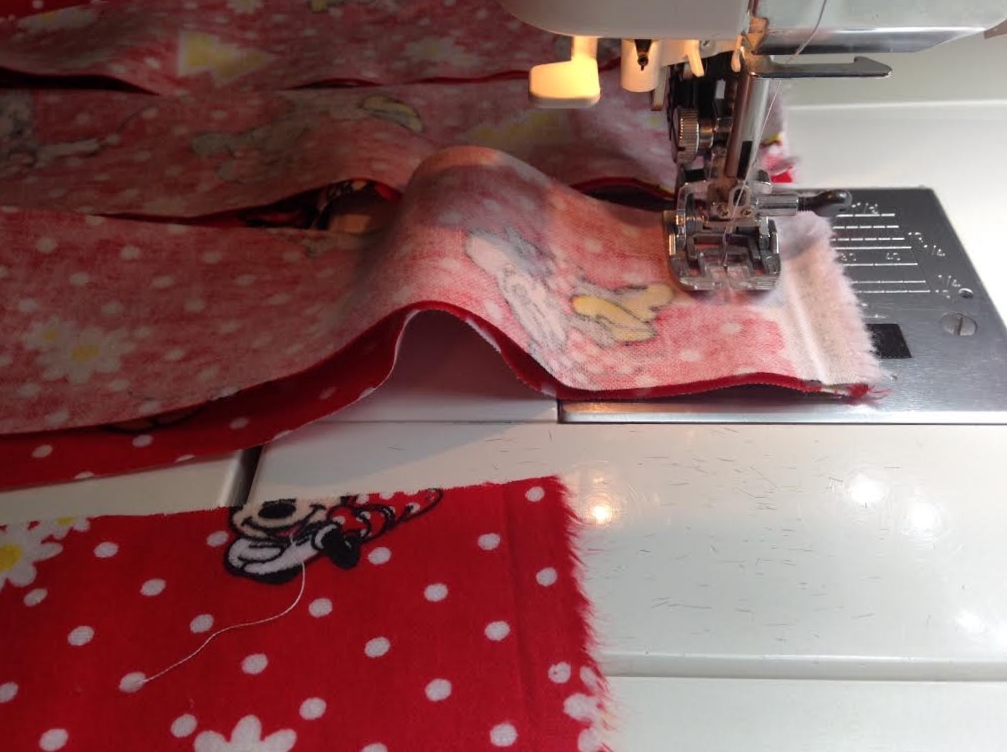
I like to add a edging to the top of the quilt to bind and frame it and make my outer rag edges fluffier.

I cut six WOF flannel strips from my red Minnie fabric.


I pressed in half.


I sewed this strip to the edge with the raw edge facing out
and aligned with the edge of my quilt top.


To turn the corner, I just cut the strip.


Turned the corner and did the next side.

No mitered corners needed.


Then I snipped and snipped and snipped

1/2 inch apart on all the edges of my quilt.

I found my spring snips could cut through three layers easily, but not all six layers at once.

The snipping is the most labor intensive part of making a rag quilt.

It can get very tiring on the hands even with the spring type scissors.
My snips are a few years old.
I think there are some new better snips that I will purchase before I make another rag quilt.


Here is a close up of the top.


Here is what the back of the quilt looks like.


Time to wash!

I washed this top three times before I packed it off to my grand-darling.

Since I used red flannel, I made sure I put a  new color catcher in with each wash.

The color catcher was still pink after the third wash and it was still shedding fibers.

It also makes  a lot of lint in your dryer.

My daughter has washed it twice, by itself, using color catchers and it is still shedding and running.

Always wash  and dry a rag quilt by itself!

The more you wash and dry a rag quilt, 
the softer and fluffier and more snuggly it gets. 


Here is a closeup of the corner and edging effect from adding the "binding" strips.

I enjoyed every minute of this labor of love ...


Everly loves her raggedy heart quilt!

Linking up with all the lovely quilty projects 
@


Linky Tuesday @ Freemotion by the River


If you make a rag quilt for someone you love from this tutorial,
I would love to hear about it.

:)