
This is how I made my Raggedy Heart Rag Quilt

I drew up a basic layout on EQ to plan my quilt.
This quilt is seven squares in seven rows.
Block squares are cut at 9" by 9"
Seam width is 1"
The finished quilt measures about 51" square.

I used a flannel square for the "batting" in my quilt.
You need 147 nine inch flannel squares for this quilt.

I cut a 6 inch heart template from freezer paper.

Pressed onto a double layer of red flannel.

Cut pairs of hearts, wrong side of fabric together, to sew onto seven of my flannel squares.
Except for the Minnie Mouse fabric which I purchased specially for my granddaughter,
I used a stash of fat quarters, small cuts and yard pieces of flannel fabrics from my stash.
I cut my squares at 9" to get the most squares
from the FQs and Yard pieces.


You can cut FOUR 9" WOF strips from a yard of fabric,
stack them and cut SIXTEEN 9" squares.
Katiniss was my ever present quilty helper and inspector.

Katniss and I made 49 sets of squares.

I also kept a stack of 49 single layer squares
(shown in the upper left of photo)
to use for "batting" in the blocks.
That is Katniss' tail in the upper right corner as we moved off to the sewing machine.

Sew a line of stitches from corner to corner through all three layers.

Turn block a sew corner to corner again.

This "X" is your quilting as you go.

I sewed a pair of red hearts onto the center of seven squares,
making a 1" seam.

Then I snipped at 1/2" intervals around the heart.
Spring loaded scissors with short blades are the best I have found for this snipping.

Make 7 raggedy heart blocks,

Make 42 plain quilted squares

layout in seven rows of seven squares

Since this quilt will get many, many washings and needs to be sturdy and long-lasting,
I used my heaviest duty cotton, King Tut, 40/3ply for piecing this quilt

I set my Janome on a long stitch to go though all the layers and make strong even stitches.

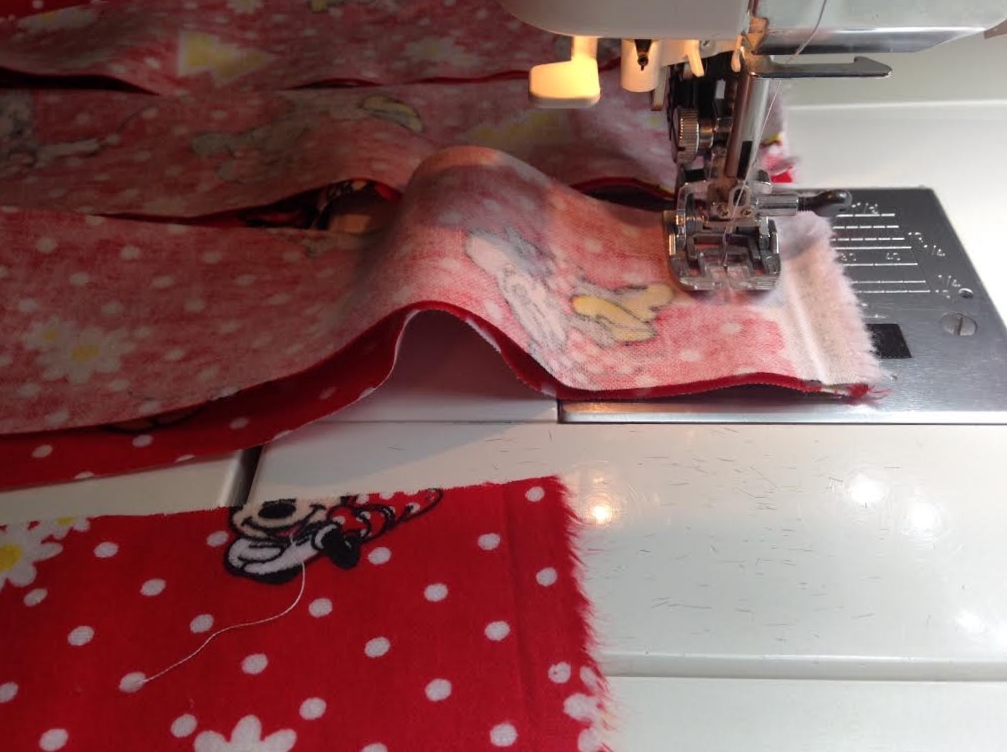
Sew the blocks together into rows.
You will be stitching through six layers of flannel here.

I made 1" seams so I could snip 3/4 inch deep cuts for the rag edges.
You sew these blocks together with the back of the blocks facing each other.

When sewing the heart blocks into the quilt, I made sure I did not catch the edges of the hearts.
You can see the "stand up" seam on the top of the quilt on the left here in this photo.

Katniss and I laid out the rows.

When sewing the rows together, match corners and sew over the rag edge on the top of the quilt.

Another look at sewing the rows together.

This is what the top of your rag quilt will look like before your snip, snip, snip.

I like to add a edging to the top of the quilt to bind and frame it and make my outer rag edges fluffier.
I cut six WOF flannel strips from my red Minnie fabric.

I pressed in half.

I sewed this strip to the edge with the raw edge facing out
and aligned with the edge of my quilt top.

To turn the corner, I just cut the strip.

Turned the corner and did the next side.
No mitered corners needed.

Then I snipped and snipped and snipped
1/2 inch apart on all the edges of my quilt.
I found my spring snips could cut through three layers easily, but not all six layers at once.
The snipping is the most labor intensive part of making a rag quilt.
It can get very tiring on the hands even with the spring type scissors.
My snips are a few years old.
I think there are some new better snips that I will purchase before I make another rag quilt.


Here is what the back of the quilt looks like.

Time to wash!
I washed this top three times before I packed it off to my grand-darling.
Since I used red flannel, I made sure I put a new color catcher in with each wash.
The color catcher was still pink after the third wash and it was still shedding fibers.
It also makes a lot of lint in your dryer.
My daughter has washed it twice, by itself, using color catchers and it is still shedding and running.
Always wash and dry a rag quilt by itself!
The more you wash and dry a rag quilt,
the softer and fluffier and more snuggly it gets.

Here is a closeup of the corner and edging effect from adding the "binding" strips.
I enjoyed every minute of this labor of love ...

Everly loves her raggedy heart quilt!
Linking up with all the lovely quilty projects
@

Linky Tuesday @ Freemotion by the River
If you make a rag quilt for someone you love from this tutorial,
I would love to hear about it.
:)

I drew up a basic layout on EQ to plan my quilt.
This quilt is seven squares in seven rows.
Block squares are cut at 9" by 9"
Seam width is 1"
The finished quilt measures about 51" square.

I used a flannel square for the "batting" in my quilt.
You need 147 nine inch flannel squares for this quilt.

I cut a 6 inch heart template from freezer paper.

Pressed onto a double layer of red flannel.

Cut pairs of hearts, wrong side of fabric together, to sew onto seven of my flannel squares.
Except for the Minnie Mouse fabric which I purchased specially for my granddaughter,
I used a stash of fat quarters, small cuts and yard pieces of flannel fabrics from my stash.
I cut my squares at 9" to get the most squares
from the FQs and Yard pieces.

You can cut FOUR 9" squares from a FQ.

You can cut FOUR 9" WOF strips from a yard of fabric,
stack them and cut SIXTEEN 9" squares.
Katiniss was my ever present quilty helper and inspector.

Katniss and I made 49 sets of squares.

I also kept a stack of 49 single layer squares
(shown in the upper left of photo)
to use for "batting" in the blocks.
That is Katniss' tail in the upper right corner as we moved off to the sewing machine.

Sew a line of stitches from corner to corner through all three layers.

Turn block a sew corner to corner again.

This "X" is your quilting as you go.

I sewed a pair of red hearts onto the center of seven squares,
making a 1" seam.

Then I snipped at 1/2" intervals around the heart.
Spring loaded scissors with short blades are the best I have found for this snipping.

Make 7 raggedy heart blocks,

Make 42 plain quilted squares

layout in seven rows of seven squares

Since this quilt will get many, many washings and needs to be sturdy and long-lasting,
I used my heaviest duty cotton, King Tut, 40/3ply for piecing this quilt

I set my Janome on a long stitch to go though all the layers and make strong even stitches.

Sew the blocks together into rows.
You will be stitching through six layers of flannel here.

I made 1" seams so I could snip 3/4 inch deep cuts for the rag edges.
You sew these blocks together with the back of the blocks facing each other.

When sewing the heart blocks into the quilt, I made sure I did not catch the edges of the hearts.
You can see the "stand up" seam on the top of the quilt on the left here in this photo.

Katniss and I laid out the rows.

When sewing the rows together, match corners and sew over the rag edge on the top of the quilt.

Another look at sewing the rows together.

This is what the top of your rag quilt will look like before your snip, snip, snip.

I like to add a edging to the top of the quilt to bind and frame it and make my outer rag edges fluffier.
I cut six WOF flannel strips from my red Minnie fabric.

I pressed in half.

I sewed this strip to the edge with the raw edge facing out
and aligned with the edge of my quilt top.

To turn the corner, I just cut the strip.

Turned the corner and did the next side.
No mitered corners needed.

Then I snipped and snipped and snipped
1/2 inch apart on all the edges of my quilt.
I found my spring snips could cut through three layers easily, but not all six layers at once.
The snipping is the most labor intensive part of making a rag quilt.
It can get very tiring on the hands even with the spring type scissors.
My snips are a few years old.
I think there are some new better snips that I will purchase before I make another rag quilt.

Here is a close up of the top.

Here is what the back of the quilt looks like.

Time to wash!
I washed this top three times before I packed it off to my grand-darling.
Since I used red flannel, I made sure I put a new color catcher in with each wash.
The color catcher was still pink after the third wash and it was still shedding fibers.
It also makes a lot of lint in your dryer.
My daughter has washed it twice, by itself, using color catchers and it is still shedding and running.
Always wash and dry a rag quilt by itself!
The more you wash and dry a rag quilt,
the softer and fluffier and more snuggly it gets.

Here is a closeup of the corner and edging effect from adding the "binding" strips.
I enjoyed every minute of this labor of love ...

Everly loves her raggedy heart quilt!
Linking up with all the lovely quilty projects
@
Linky Tuesday @ Freemotion by the River
If you make a rag quilt for someone you love from this tutorial,
I would love to hear about it.
:)
6 comments:
This quilt is absolutely adorable, as is your cuddly little model! One question, did you prewash your flannel before making the quilt?
I do not usually pre-wash flannel when making a rag quilt. I do usually pre-wash all fabrics except minkee.
For this quilt I used some scrap flannel that was prewashed from other projects and some new flannel that I did not pre-wash. I could not see any uneven shrinking in the finished quilt.
I wash rag quilts several times after the quilt is complete to give it that soft ruffly effect. It makes a lot of lint in the washer and dryer so I always clean the traps before the next round in the washer and dryer.
This works for me ... :)
Cute quilt and granddaughter.
Oh this is such a fun raggedy finish! I love the addition of the hearts...almost as cute as your little model. (Love her glasses!)
Great looking snugly quilt! I thinks she likes it!!! What a cutie!!
Thanks for the tut, Pat. I'm visiting from Crosses on Facebook. I talk about doing a quilt like this; your tut is wonderful.
Post a Comment