Friday, August 31, 2012

My August Schnibble Top is Done!

My August Schnibble

In the eleventh hour, I have completed Dimestore for the "Another Year of Schnibbles" Quiltalong.  The pattern calls for an outside border of the light background fabric, but I am not sure I want to add this border so for now I am leaving it off and calling this top done. 

The charm packs I used are an older Moda line, "Grand Finale" by Sandy Gervais.  I love fall fabrics and colors so when I saw these charm packs on clearance in the summer sale section at my favorite local quilt shop, I knew these were just what I wanted to use for my August Schnibble.

At 48" square it is already ten inches larger than the finished size of the original pattern.  I planned it this way by cutting my light background squares larger at five inch squares.  I am planning to use it as a fall tablecloth for my round kitchen table and it is a good size now.

Tonight, I am undecided as to how I am going to quilt this.  I had been going to make a very special pieced backing.  It has been suggested that fall leaves quilted in the cream squares would look nice.  I may work out a plan that would allow for both.  I may not. Time ... and my quilty muse ... will tell.

Tomorrow I am going to play with some other fabric and then I am going to quilt the bright sunflower table topper which is ahead of this top in the "quilting queue."

Sweet Quilty Dreams!
 
:-)


Tuesday, August 28, 2012

Sashaying Along

Sash As You Go

I am making progress on my August Schnnibble.  I may or may not have it done by the end of the month, so it may become a September Schinibble.  It's all good. 

I am using a "sash as you go method" for adding the pieced sashing to the blocks.  This way I will not have to deal with lots of long strips when I piece the top together. 

If you are unfamiliar with the method, it is very easy.

Here is the how-to ...


Add one sashing strip to one side of your block. Then turn the corner and add another side.  You will have sashing on two sides and can then easily piece the blocks together, sashing as you go.  Easy peasy.  I like easy.
 
I like to call this "sashaying" ... ;)
 
Square dancing along with my quilt squares here today.
 
Have a happy quilty day ...
 
:-)


Monday, August 27, 2012

A Small Burst of Color ...


... happened upon my cutting table early this afternoon. ;)

Not quite what you were thinking you might see on my blog today as I said in my last post that I was working on my August Schinibble quilt.

This is what resulted ...


This is how it happened ~~~~~~~~~~~~~>

During my lunck break I ventured upon the


running at Canton Village Quilt Works  and the colors in the block that Amy from Amy's Creative Side designed grabbed me.  I had to find some colors of my own and make a block.

I think I like it!  :)
 
Photos of the quilts of many colors coming together for this Bloggers BOM Quilt along may be enjoyed here on their Flicker Group.

I think I may make some more of these blocks soon.  Maybe I will even catch up on the blocks before this quilt along ends.

But for now, back to my regularly scheduled quiltyness ...


I am going to call this quilt "Autumn Crossing"
 
Have a happy quilty day, my friends!
 
:-)

Saturday, August 25, 2012

August Schinibble

 
A Schnibble For Fall

Shhhhhhhh! .... I am working on the Another Year of Schnibbles quilt for August.  I love Carrie Nelson's easy little patterns for charms and such.  This is actually going together very quickly.  I may actually get the top done in August.  ;)

I did finish the last of the current Quilty Auntie blocks.  These are for Kyle.  Happy Blocks with "Boy" I Spy centers and blue and brown borders.  This quilt is going to be so darling and will be one a boy can enjoy and treasure as he grows. 

Happy Boy Blocks for Kyle

Time to sew more schinibbles!
 
Have a happy quilty weekend!
 
:-) 

Friday, August 24, 2012

LIfe In The Scrapatch Lately


Katniss got a "lion cut" !  ;)

When we adopted her at the shelter, Katniss had nasty fur knots all over her back.  I have never had a cat with such a problem.  Since she had been a stray, she must not have tried to keep up with grooming her long silky fur.  These knots must have been painful for her as she could not really arch her back and we discovered afterward that the probelm with her back legs was related to this.  We had thought it was an old injury. Whenever she sat or crouched, she would put her right rear leg out and she walked with a limp and could not jump much at all.  Poor kitty.  After a month of trying to work the knots out ourselves, my hubby finally decided to take her to the groomer and get her a buzz cut.  She is very happy with her new haircut and is running and jumping and playing like a kitten.

Katniss has also been running and jumping with a kitten.  We were taking care of one of my four-legged grands while my daughter made her vacation escape.  Katniss enjoyed having Pepper for a playmate.  My daughter is back and Pepper has gone home now and Katniss is looking all over for her ...

Where's Pepper?

Pepper was also a big quilty help while she was here.

Pepper is getting big!

On the quilty side, my big beautiful Janome has come home!  :)

I have been making baby blocks for the grandbaby boomers on the Quilt and Needle Quilty Auntie Quilts.

For Kendalyn ...


For Dougie ...


For Dougie's baby brother on the way, Pete ...


More baby blocks to make today for Kyle.

Have a Happy, Quilty Day!

~~~~~~~


Monday, August 20, 2012

And The Winner Is ...


Quilt Hollow is the winner of the pink and green little Log Cabin Keychain!

To receive your squishy in the mail, please send me your address.  My blogging email address is on my profile page.

More giveaways coming soon.  I have been going through my quilting stuff and found duplicates of a couple of books that need to find new homes.

Have a happy quilty day!  :)


Thursday, August 16, 2012

Tiny Logs Patchwork Keychain Tutorial


I have been getting to know my borrowed Janome Jem Platinum and have been been playing with my scraps.  I love scraps!  The smallest I usually use are 1-inch squares.    One inch strips are fun to work with to make tiny key chains and other tiny quilty treasures. I have used 3/4-inch pieces in the past, too, but they sometimes "seam" a bit too small for my eyes these days.


Here are some I have made in the past. 
 
I learned to make these a few years ago after seeing them and buying a few at their shop table at the Rising Star Quilt Guild Show.  This guild always puts on a wonderful show in a historic hall in Lexington, MA.  I am really looking forward to their show again this year in October. 

After taking home my tiny quilts show treasure I studied it awhile and then figured out how to make some of these tiny treasures for myself.  They also make nifty giftys. :)

Here is how to make a Tiny Log Cabin Key Chain


Start with 1-inch ( or 3/4") squares and strips from your scraps. 
Cut them carefully to size.
Pick a 1 inch square and a 1" by 2" strip to start or sew two 1" strips together and then cut into 1'inch strips. I like to "assembly" line these and make a small batch of tiny log cabin blocks at a time.


Press seams open.


Continue to add strips and press seams open and square blocks as you go.  I put pink strips gradating light to darker on two sides and greens on the other ending with a my darkest green strip.


To sew, make in rounds as you would any Log Cabin Block.


Continue around
 

Pressing, trimming and squaring to size is very important. 
 
I usually do a combination of hand-trimming with scissors and use a rotary cutter and cutting mat to trim.


I also check carefully to make sure these blocks are squared as a go around.

Here is a completed 3-inch log cabin block.

Back ... with seams pressed open ...


and front ...
 
I find pressing is very important when making these.  Sometimes I just use my seam roller by my machine. I also have found I like to press the seams open as I go.  I always give them a good pressing with my iron before finishing. Best Press or another starch alternative is a good addition when pressing these.

Now it is time to pick a block and make the key chain. :)

Make a handle for your key chain, by pressing a 1" x 4" strip of fabric into a bias tape strip ...

then fold in half and press again ...


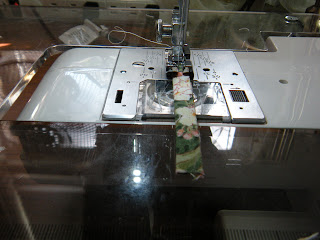
Topstitch the handle strip closed ...


Time to assemble to key chain. :)

Attach the handle strip to the backing of your key chain.  Place the backing right side up and use one pin to attach the handle with the raw edges out to one corner of the square.


Layer the top block to the backing right sides together.  Make sure the handle is in the middle with just the raw edge sticking out into the seam line.

Add a layer of batting that has been carefully cut to size.


Please notice that I have trimmed three sides of the backing and left a longer opening on the side that I will leave open to turn the key chain right side out.  I trim the backing to a 3" square with no longer side.  This is important because you will be turning the square over and stitching the sides on the backing.


Start in the corner diagonally across from the one where the handle is pinned.  I start on the open side and put a few stitches and then turn the corner onto the next side.  Continue stitching around and remember to remove the pin where the handle is just before you stitch that corner.


Stitch the third side and turn the corner onto the side you will leave open and stop, leaving at least a 1-inch opening.


Turn your key chain right side out. The handle become an easy tool to help pull this right side out.  Use a dull pointer of some type to push the corners out square.  I like to use a bone tool used in scrap booking and journal making to press paper folds flat.


Fold the seam allowance in on the open side.  Press.


Hand stitch the opening closed using a blind stitch.  This is the hardest part for me these days because on my poor eyesight.  If you preferred, you could machine top stitch around the edges to close the opening and add a machined top stitch around the edge.


Attach a metal key chain ring and you are done!

Needle keeper idea. 

I use an old rotary cutting blade case as a keeper for my threaded needles.  This is very important if you have pets and young children around.  My cats like to get into my sewing stuff.  Katniss, in particular, has a tendency to chew threads.  Many, many years ago when I was a child, my cat got a sewing needle that my Mother was using for mending caught in her throat.  Poor kitty.  Fortunately she did not swallow in and it became lodged in the back roof of her mouth.  A trip to the vet was needed to remove it.  I remember holding my kitty in my lap and crying all the way there and hugging her tight all the way home.  I was about seven years old. Ever since, I have tried to be very careful to protect my quilty helpers from a similar accident.


Here is my completed Log Cabin Key Chain.  The Log Cabin Block measures about 2.5" square.  I used to be able to make these smaller when my eyesight was better.  I have not made these in awhile.  It is nice to find I still can.  :)
 
If you need clarification on any of the how-to steps here, just let me know.

Have a happy quilty day!

:-) Pat

Wednesday, August 15, 2012

Making Cents Scrap Quilt


Making Cents Scrap Quilt
Since yesterday was a no-sew day, I spent my sewing minutes playing with fabric, patterns, designs, and here is the result ... a new "Scrapatches" pattern ... soon to be sewn in pink and green scraps, photographed and posted here on my blog.

Since my daughter dropped off her pretty little Jem ...


my sewing spot is looking sew much better today!

Time To Sew
Have a Happy Quilty Day :)


Tuesday, August 14, 2012

A Scrap Basket Quilt Start


Post # 3 for the day on the "no sew" day ... ;)

During the curtain sewing marathon, I started a scrap basket quilt. 

(I miss My Janome ... she is sew beautiful)

It began as a "leaders and enders" project because my big beautiful Janome was snatching the fabric down into the thread hole and making nasty little knots with the bobbin threads ... which is one of the reasons I decided she needed some spa treatments.


I had  a lot of pinks and greens in my scrap basket which was augmented by my purchase from a quilt show white elephant table of a little plastic baggie chock full of 4" squares of pinks and greens, mostly "shabby chic" type florals.  I recall that the baggie cost .25 cents. One quilter's scrap is another quilter's treasure.


I saw the Rhubarb Pie Quilt Kit on the cover of the spring Keepsake Quilting catalogue and an inspiration germinated.

The KQ quilt uses 2.5 inch strips and most likely is strip pieced and I started with 4" scrap squares sewn in pairs, so I needed to adapt ...


So I dug through some more of my scraps, worked up my own plan and have a start on my way making my own scrap version on this quilt.

Since this will mostly be a leaders and enders project, you will not be seeing this quilt complete anytime soon, my friends. Will post my progress from time to time.

I think I shall call this pattern "25 Cents"

Sew I am quilty day dreaming today ... :)