Wednesday, March 31, 2021

Stitch Sew & Show ~ Week 12


Welcome to Stitch Sew & Show ~ Week 12

It has been a week of spring cleaning, inside and outside

but I have found time to sew everyday.

Yesterday I saw a block on Instagram that I just had to sew.

It was a twist on the traditional Rail Fence Quilt.


The fabric is 

Violette 40 Karat Crystals Strips

that I bought on a Flash Sale at Fat Quarter Shop


These are the four strips I picked for this block.

I like the minty green with the purples.

The background is more cream than white which gives it a soft color look.


I saw the prototype for this block 

Here on Instagram @StoriedQuits314

I am loving this twist on the Rail Fence Block. 

Since there were no instructions for this block, 

I made my own version of it.

Click Here for a Stop Motion Video

 of How Vasudha Made Her Block

I also follow her blog.

I am hoping  Vasudha @ Storied Quilts

will name her block and write the pattern. 

For now I have had fun playing with this block.

I decided to may make more with my strips.

I am using a roll of Bella Solids, Color 98,

as the background fabric for the rest of the blocks.


Here are my strips for Block 2.

I will not be posting any cutting or sewing photos

as this is not my block design.

I love this block! 

 Do you think it looks like a flower or a pinwheel block? 

~

Linking Up with Patchwork & Quilting


What have you been sewing and stitching?

Please share in my linky party ... :) 

You are invited to the Inlinkz link party!

Click here to enter

Tuesday, March 30, 2021

#IGQuiltFest2021 ~ Day 31 ~ Favorite Post


My favorite post of all time is my

Easy Tumbling Blocks ~ No "Y" Seams ~ Part 1

It has 54.1K pageviews!

This post series is from 2012.

I wrote this tutorial to help and online quilting friend

who wanted to know how to sew this traditional pattern without "y" seams

to make a quilt for one of her grand children.

I used basic rulers and my cutting mat

 to show her that no special tools are necessary.

~

This method allows the blocks to be sewn together in strips

by cutting one of the diamonds into triangles. 


Part 1 ~ Cutting Instructions


Part 2 ~ Sewing the Strips


Part 3 ~ Adding the Borders


The finished quilt was featured that year in my

Quilty Christmas Open House, 2012


In 2014, I thought about making a 

Country Girl ~ Easy Tumbling Blocks

baby quilt in this pattern for my grand-darling

in some pretty Country Girl fabrics.

I ended up making here a Minnie Mouse Rag Quilt as 

Mickey and Minnie are (still) her favorites.

This year she needs a new bed quilt and I am thinking again about making

a twin size Tumbling Blocks Quilt.

Hmmm ... time will tell. 

~

This is my final post for the 

#IGQuiltFest2021

It has been a fun month sharing with the other quilters participating on Instagram.

Sew Much Inspiration!


Monday, March 29, 2021

# IGQuiltFest2021 ~ Must Make ~ UFOs


For my "Must Make Quilts" I have chosen the UFOs from

My Quazy Queens Post in March, 2019

Rather than post some new huge goal, I decided to revist some of my old ones.


My "Must Make" Projects are:  


Patchwork of the Crosses EPP Blocks 


My Ventana and Trinket SAL Quilts


365 Blocks in 365 Days ~ "Good Karma" 


My Postage Stamp Scrap Quilt


I am also adding my 

My Simple Stitches Embroidery Project

on which, I think, the stitching is near or complete and just needs to be taken out of the project bag and finished into a wall hanging or pillow.


Well, that is it ... 

and it may take me another two years, 

but I want to make these all finishes.


Wish me luck! 


Sunday, March 28, 2021

Born to be Wild Blog Hop ~ Sign Up Now


Are your quilts "Born To Be Wild?"

Then this is the blog hop for you! 

Click Here For All Info


This fun blog hop is being organized and hosted by the lovely

Carol @ Just Let Me Quilt

Hope to see you joining us in the hop! 


Saturday, March 27, 2021

The Fabric Bucket Making Brigade


Saturday Sewing

Today I am working on the small and large fabric buckets.

#IGQuiltFest2021 ~ Day 27 ~ Current WIP


 I have quilted the two side panels with wave quilting.


I spiral quilted the bottoms of the buckets.


Then I assembly-lined the handles for the last two buckets.


I stitched each the ends.


Then I folded and clipped the center of the straps.


The handles are topstitched with a straight stitch.

Four handles done!

Time to attach them to the buckets sides and make the linings.

Hopefully I will have three buckets done at the end of the weekend.


Linking Up Today 

@

Patchwork & Quilts


Have a Happy, Quilty Weekend! 


Friday, March 26, 2021

Scalloped Quilt Binding Tutorial


Scallop Quilt Binding Tutorial

I have my own method for cutting and  sewing a scallop binding for a quilt.

I have been using this method for many years for curved bindings.

Today's tutorial shows how I cut and sewed the binding for my


 Show Your Stripes Blog Hop Quilt

This is an advanced scalloped binding as it has points on the corners.


If you have never done a curved binding you may want to start as I did, 

with a small project, like these

 Heart Shaped Mug Rugs ~ Tutorial Here 


I cut my binding strips on the width of fabric and I have never had any difficulty easing the curves.

For a tutorial that shows how I cut, sew and press my bindings, Click Here.

Many quilters prefer to cut binding strips on the bias for a curved binding.

Every quilter should always follow their own quilty muse.


I sew my strips together on the straight edge and use my binding baby.


I quilted my quilt edge to edge.
My quilt measured 64" square.

I used my Quick Curve Ruler to cut my scallops.

To determine how many scallops  I would have on each side 

I subtracted 4" for the depth of the curve and divided my 11"

which is the length of the curve on this ruler.

This determined that I would have 5 scallops per size with about 4" extra.

The extra inches will form the points on the corners. 


I trimmed and squared all the edges on my quilt before I marked my curves.

To mark my scallops, I start in the middle of each side.

I turned the ruler and used a pencil to mark the center.

The pencil marks will not be visible, but they could be erased.

You may use a Frixon pen or whatever marking tool you prefer.

Then I marked the outer point of each scallop.

I did not draw lines for the curves.

Then I moved the ruler outward on each side of center and marked each scallop.

I marked all sides before I cut.


To determine the corner point I simply extended my QCR

 off the edge of my trimmed quilt.

You can see in this photo that my ruler is squarely on the corner.

For the points,  I did lightly pencil the curve off the edge of the quilt,

but this is not necessary as long as your ruler is held steady and straight.


Then I cut my scallops, starting in the center of each side. 

I made sure my ruler was aligned with the marked dots and held it steady

and used my rotary cutter for the curve.

I have found I need to use a pair of sharp fabric scissors to make a clean cut

from each direction where the curves meet. 


To cut the corner points I use my rotary cutter and cut in both directions

You can see a very small miss cut in this point where I Moved my ruler slightly,

This will not matter as it will be covered by the binding strips. 


Here is my cut scallops before sewing the binding. 


I machine sewed the binding to the front of the quilt,

easing the curves and pivoting the angles.

 I stop and turn and resume each inside or outside angle much
 I would for regular 90 degree corners. 
I loosely adjust for the difference in the angle.
It will all work out in the end. 


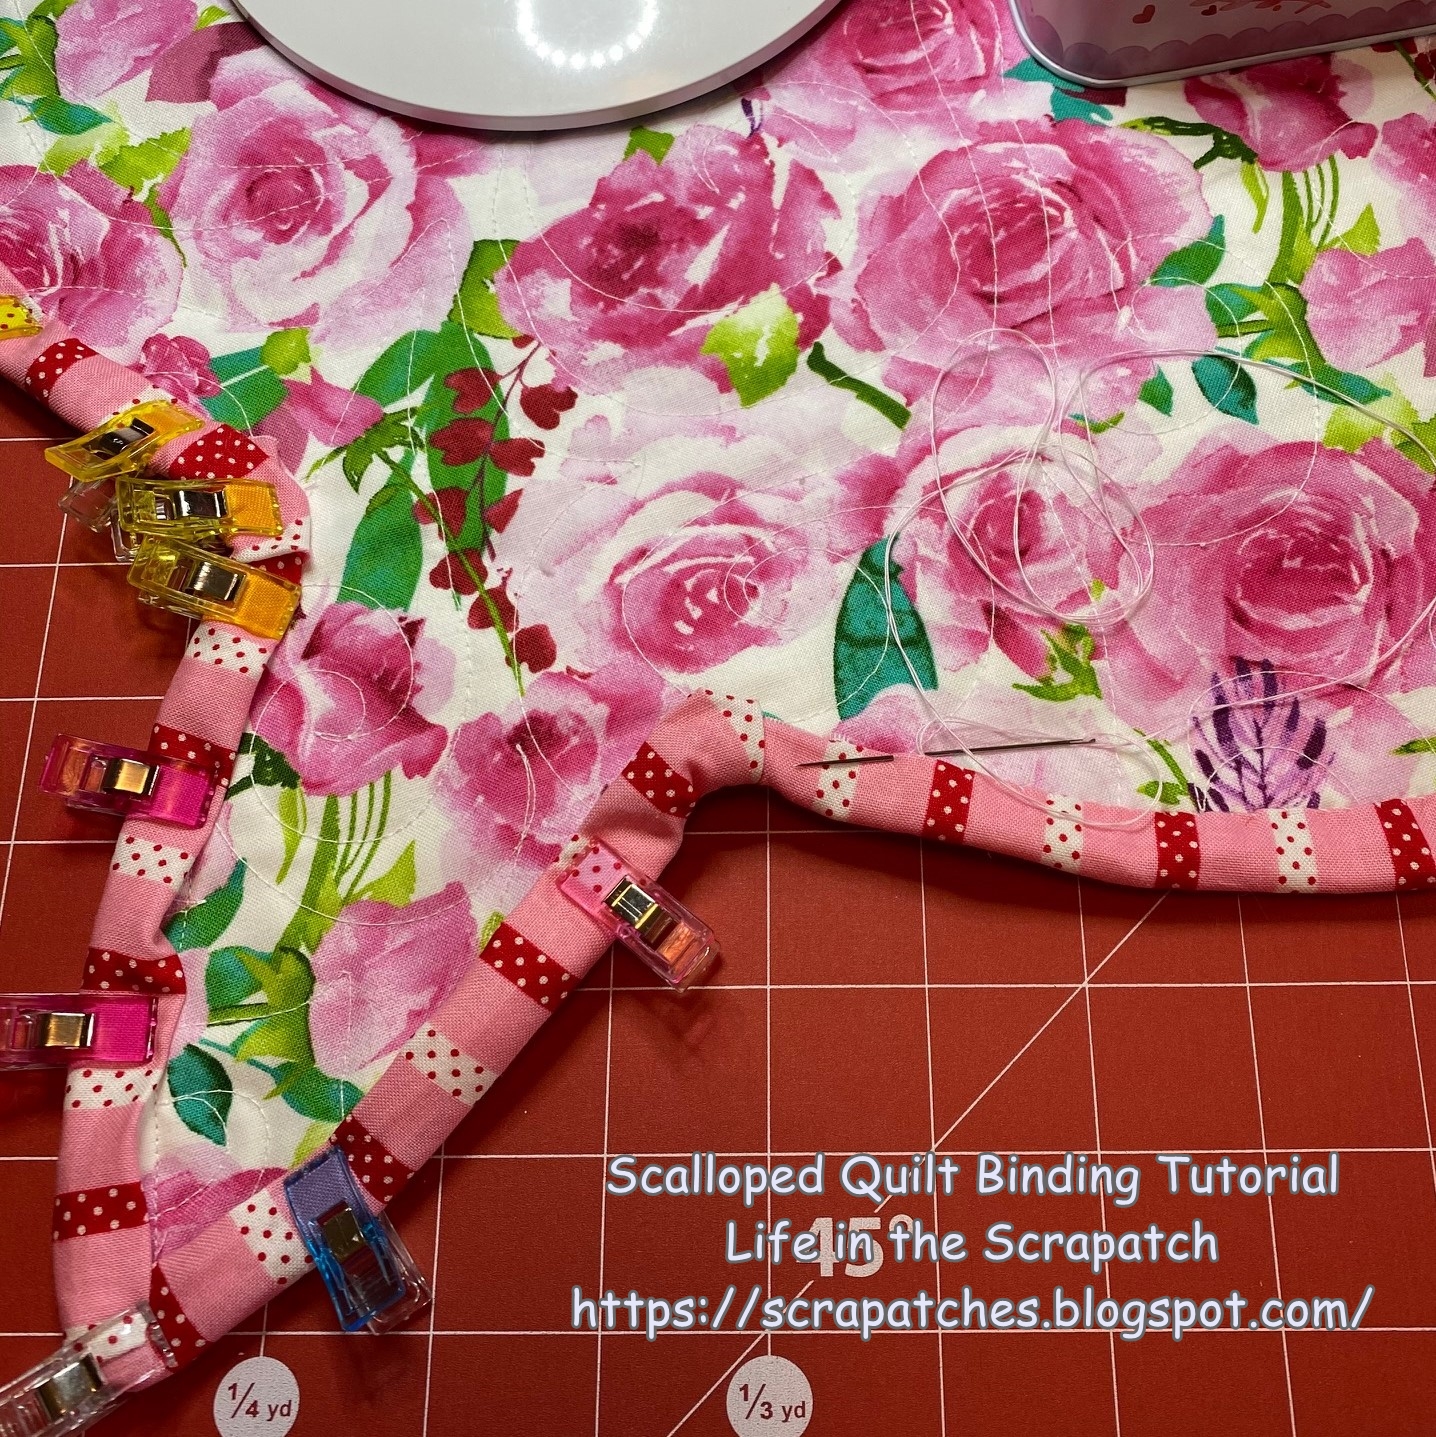
I turn the binding to the back and hold in place with mini clips
and hand sew the binding to the back.
I place extra clips to secure the folds in the turns.


Hand stitching this side is one of my favorite parts of the quilt making process.


I like to use a beeswax thread conditioner when I am binding to keep my thread from twisting.
My favorite hand needles are Bohn as they are strong and rarely bend.
This is a short sashiko needle which I find easy to thread as it has a larger eye than most hand sewing needles. 


I hope you have found this Scalloped Binding Tutorial useful.

Please email me if you have any questions about this or the
Heart Shaped Mug Rug Tutorial.

Happy Quilting! 


Thursday, March 25, 2021

I Like Thursday # 90 ~ Together


I am feeling much better and I feeling a burden has been made lighter.

We all carry concerns about our own health and want to protect others.

My heart goes out to all who are grieving today.

May together we make the world a better, safer place. 

Thanks to all who have send kind words this week.

Today I hope to catch up on the posts I have missed in the blog hop 

and to visit my friends at

I Like Thursday Bloggers @ Not Afraid of Color

Thanks for visiting with me.


Wednesday, March 24, 2021

Stitch Sew & Show ~ Week 11


 Welcome to Week 11 of my Stitch Sew and Show Linky Party


I do have a finish to show this week.

I made this fabric bucket for the Salt and Sand Blog Hop

More photos and pattern info Here


Yesterday I was enjoying the blog hop and 

I was happily working on the smaller bucket when

My Covid-19 Vaccine threw me for an unexpected loop.

I was down and out for a few hours yesterday 

with chills, fever and nausea.

I am feeling much better today but I am achy and fatigued.

Today will be a day of rest.


Thanks to all who join in my linky party fun! 


May you have a happy quilty day.


You are invited to the Inlinkz link party!

Click here to enter