Friday, October 31, 2014

Spider Web Quilt-Along 2014 ~ My New Spider Web!


My New Spider Web Quilt!

To wrap up this year's 


I would like to share the how-to for making this larger web ...


Materials Needed:


168 squares 2.5"

21 are needed for each of eight sections


2 yards of black fabric for web, backing and binding

40" square of batting

Method:


Piece rows.


Press seams open as you go.


Using your 45 degree ruler or lines on your mat ...


cut triangles.


Layout


Time to add the curved black web.

I cut 13" by 7" sections and used my Quick Curve Ruler or a plate to cut the bands.

I cut two 17" by 10" sections to cut then longer outer bands and sewed these on first.


I cut the outer curve first as shown.


Then, using this as a point of reference, I cut my other curves.


I took photos and put them up on my desktop and checked each placement before I cut 


It is important to cut each curve in the same place so the web will align.


Ready to sew ...


Sew the concave to the convex curves, easing carefully.

I use a pin to mark the center.

I press toward the black.


Align your pieced and pressed units to the 45 degree line on your cutting mat
and trim evenly cutting off the extra black fabric.


Turn and trim the other side.


Top layout  ... ready to add black sashing web.

Cut 8  WOF strips 1.5" wide and sew to the right edge of each of the wedges.

Piece into two halves ...


Sew one WOF strip to one side.


With your quilty helper sew the two halves together.

Prepare your quilt sandwich and quilt as desired.

40" square of batting and backing


I use Softy and Crafty poly batting which I buy off the roll from my nearby JoAnn Fabrics.

For most quilts I use cotton batting but this batting works well for the web 
as it is thin and holds it shape well without being too stiff.

I do not pin or baste or use basting spray.  
I smooth the top and baking over the batting and
I press the top and back of the quilt sandwich before I quilt,
being careful not to touch the poly batting with my hot iron.


I used Superior King Tut "Orange Zest" for this quilt and used my walking foot in the black sashing to accentuate the spooky spider web.

I cut four 2.25" strips of the black fabric for my single fold binding.


I hope you have enjoyed this tutorial!

This wraps up my

Spider Web Quilt Along 2014

This free tutorial will remain up on my blog.

If you make a spider web quilt at any time, please send me a photo 
or add it to our Flickr album.

It would make me sew happy to see your version of the pattern.


This quilt was featured at


Thank you, Madame Samm!

For more photos of  my quilt please 


Happy Halloween!

~~~~~~~~~~~~~~~~

Edit Nov 4th: 

Linking up this new tutortial today at


Linky Tuesday @ Freemotion by the River

Click on the link above to also see that the

Spider Web by Marcy @ Made by Me in Red

is featured there today!

Congratulations, Marcy!

It is a joy to see this beautiful quilt made with my tutorial featured
 on Connie's wonderful blog.

:)


Thursday, October 30, 2014

Black Cat Crossing Blog Hop


A new Spider Web Quilt!


I have really loved working with these beautiful fabrics,


Thank you Maywood Studios for sew generously sponsoring this hop!


Here is the back of my quilt!

More photos ...


Close up of the center of the quilt. 


For my


I followed the same steps and added a new twist this year.


I added two more rows of squares
and I curved the outer band of patches
and made the border narrower
to make my web larger and better shaped.


I really like the new, improved web!

Click Here for Free Tutorial

Life has been happening.

I am sew happy that I have finished my new spider web quilt in time to share with you!


Please haunt all these quilty happenings: 


Thanks to 


Spooky Madame Samm @ Sew We Quilt

and

Wicked Wendy @ Why Knot Kwilt

for summoning this quilty coven.


Happy Halloween!


Wednesday, October 29, 2014

Spider Web Quilt Along 2014 ~ Finishing The Quilt


Sneak Peak!

I have been quilting my new spider web.

My quilt will be up at the stroke of midnight.


I followed the same finishing steps this year.

I will be posting more about my new quilt after my blog hop post.

For all the steps in this tutorial click HERE

How is your spider web coming along?

:) 

Sunday, October 26, 2014

Spider Web Quiltalong 2014 ~ Creating the Web

~ Spider Web Quilt-Along ~

  Sashing and Piecing the Web


Weaving the Web

Time to add the black sashing strips and to piece and finish the top!

From your border and webbing fabric cut:  1 and 1/4" inch strips

The number of strips you will need will depend upon the WOF. 

You will be sewing one strip to one side of each triangle so you will need 8 strips.

Cut one strip and gage how long it needs to be for your web, allowing at least 2" beyond the edges of both the center and the outer edge of your triangles, so that you will have nice web points on the outer edge and enough to sew the center point of the web.

Cut strips and cut them to size as you sew ...


Add one strip to the left side of your triangle unit as shown above.
Fold the right side over the left triangle and align the curved we,
 pinning these intersections.
Remove pins as you sew.


Your web pieces will look like this,
Sew a black strip to the left side and add two more triangle units in this manner to form a half of your web.

This is one half.
In this photo I have already trimmed the inside center point of the black strips where they meet to form the hub of the web.
Notice that there is no black sashing on the bottom of this half.

The center black sashing will be added to the other half of the web.


This is what the pressed back of the half looks like. 
I pressed the pieced triangles toward the black sashing.
Sew the second half in the same manner.

Add a long 1 and 1/2" strip to one long side of one half.

This will connect the two halves neatly
and make the center seam
less bulky

Sew the two halves together.

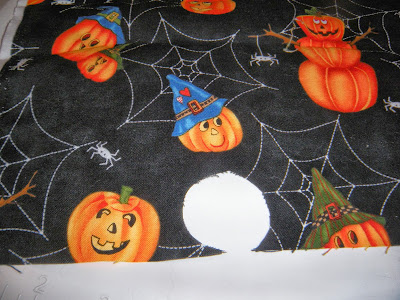
 I added a center spider cut from this fabric ...


my circle was about 2 inches round


 to add  a nice touch to my web


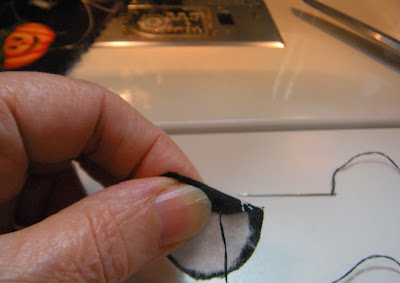
I cut a smaller circle of batting and folded the fabric circle over the edge and inserted my needle here to hide the knot. 

Then I folded the rest of the edge under as I sewed it to the web,
by inserting my needle through the back edge to hide my stitches ...


... as I sewed around the circle


The batting circle gave my spider a nice little cushion.


This web is ready for finishing!

Next Step ... Completing The Quilt!


Butterfly and I are sewing along and spinning a new web.

A surprise for ...

blog hop @ Sew We Quilt

We are posting on Halloween'een --- Oct 30th.

Beware!


If you have missed any installments in this


Spider Web Quilt-Along 

 Links to all the steps may be found here! 

 ... just keep sewing ... 

:)

Saturday, October 25, 2014

Spider Web Quilt Along 2014 ~ Adding the Curved Web ~ Step 2


Time to add the curved black web!


I chose the mottled black as it looked just right with the Boo Crew.
Your fabrics may pop with a different color web so try other ideas and pick the effect that looks best to your designer eye.


My quilty kitties and I used strips, sewed and cut afterwards.
If you are comfortable with this method of piecing, then sew for it ...


allowing about 6" between the triangles for the outer points of the web.

For these instructions, though,  
I am going to recommend that you ...

Cut:  4.5" strips 
(for 40" WOF fabric you will need 3 strips)
and then
Subcut: 8 rectangles,  4.5" by 12.5" each.


Center each triangle on the strips an sew. 

Press seams open as for squares.


Time to cut the rest of the curves for the web.


Time to Cut and Piece Some Curves!
I used my Quick Curve Ruler,  but this could be done with a small plate.
If you have a preferred curve ruler, this may work as well.

To learn how best to cut and sew with the QCR,
I am going to refer you to this link from Jenny @ Sew Kind of Wonderful who developed this quilting ruler:

Quick Curve Ruler Tutorial Videos 
 I watched these several times and read all the instructions that came with the ruler before I cut and sewed that first time
and found them to be very helpful.
I do not cross my hands over each other, as Jenny does when she holds the curved pieces for stitching as it does not feel natural to me.
Try different ways of holding and feeding the curves
to find what works best for you.
Sew a few practice scrap curves if you are using this ruler for the first time for this Spider Web Project until you feel ready to go.

Then ready, set, cut and sew!

  1st cut
First, align your ruler in the center and along a straight line
on your black border.  Cut!
You will have 8 of these crescents
These are not scrap!
You will be cutting and using these for the curved webbing:

1st cut this crescent into two long curved strips.


Then cut a tiny curve off the bottom of the small piece.


you can also cut these pieces by folding in half
and placing the center of the ruler on the fold.
Time to cut the triangles!
This is the cut that took the longest for me on the first one until I felt ready to pick up the rotary cutter.


Find the middle of your triangle and place the curve of the ruler over the section with three pieces.
Align a mark on the ruler with a straight seam.
I used the bottom seam to align this cut.
You want to avoid cutting the seams,
but you can make this cut anywhere else in this section really.
Just pick the same place on each triangle.
I aligned the edges of the curve just above the seam line.
... and cut!


last curve cut!
Place the ruler on the section with two pieces, find the center,
align the ruler on a straight line.
I used the top seam for aligning my ruler for this cut.


 Repeat for each triangle section and lay your pieces by your machine

as in the above photo.

Start sewing by turning the longest curved strip over onto the outside piece, right sides together.
Match the middles of this pieces by folding the pieces in half and lining up the fold marks.
(Sorry I forgot to take a picture of this one)

You can pin this part if you want but I did not pin at this time.

For the next seam, you may want to pin.  I did ...


try to line up the seams on the cut charms as closely as possible.
Pin as needed ... 


Remove pins as you sew!


 Add the inside smaller curved piece in the same manner.


Fold over, sew; then fold open.
Turn the small tip of the triangle over the sewn piece and sew again.


Your triangle units will now look like this.

I pressed toward the black strips for these seams.


Trim each of the 8 triangle units.

As you can see, in this one the cut charm squares do not line up "perfectly."  

I do not sew "perfect" but I try to sew "good."

If this bothers you, pick out your seam and resew.

I only did this for maybe one or two matched seams.

This was one of them ...


I actually "fixed" this one by picking out a few threads and realigning and sewing again, although it still is not quite "perfect."

"Good" works for me. :)

The trickiest part is done!


Here is a finished Spider Web Quilt by my online quilty friend,


I love this bright scrappy web!

Marcy says that she used a plate to cut these great looking curves.

Marcy has posted more pictires of her quilt in progress


and 


Thanks Marcy!

If you are sewing along 

I would love to feature your quilt here on my blog.

If you are unable to add pictures to the Flickr Album or do not have a blog,
you maye send them to me in an email and I will watermark them with your name and post them in the Flickr Album for you.


The next step will be 


If you have missed any installments in this year's


Spider Web Quilt-Along,
Time to sew!

:)