Monday, June 22, 2020

Stitching Sunshine Blog Hop ~ My Day


Hello, Sunshine Stitching Friends... :)
I love yellow flowers like sunflowers and dahlias.


When I saw the theme for this blog hop I was very happy.


I dug these blocks out of my UFO hanger and made plans ... 

Alas, it is closer to being a quilt, but still a UFO.


This is why I have not been blogging the past few days.

This is a non-quilting related mishap that almost required stitches of its own.

It is healing and I will be back soon.

I am sorry I do not have a finished project to show you.


I hope to be quilting this table runner soon
and will show you my finish as soon as I am able.

Please enjoy all the stops in the hop ...


This blog hop is hosted by the lovely

Monday, June 15, 2020

Milestone Marked


 I was surprised by this message in my email box today ..

Wow!
Life in the Scrapatch just reached 1000 followers!

... as I really do not keep track of such things.

I just like to sew and share with other quilters.

I do know I also have  well over 1000 email followers
through feedburner.

I added the email subscription link because a kind reader asked me to do so.

When I started my blog as a personal record of my quilting journey
and had only about 25 online friends following my first year.

I never dreamed I would have so much to say
and that other quilters would be interested. 

Today is a good day to say 

Thank You!

to all my readers for supporting 
my sewing and stitching adventures.

I appreciate every one of you for your kind words on my efforts.

I am taking a short break from blogging.

Be Back Soon.

May you have a Happy Quilty Day!


Sunday, June 14, 2020

Pincushion Parade Blog Hop ~ Day 15 ~ Two Pincushions


Here are my newest pincushion creations@ 
I am hosting today for the  #PincushionParadeBlogHop
I designed and made these pincushions for the


Pincushion Parade Blog Hop


Here is my Sakura Sashiko Pincushion.

This was my first thought for what I would like to make for a pincushion for this hop.
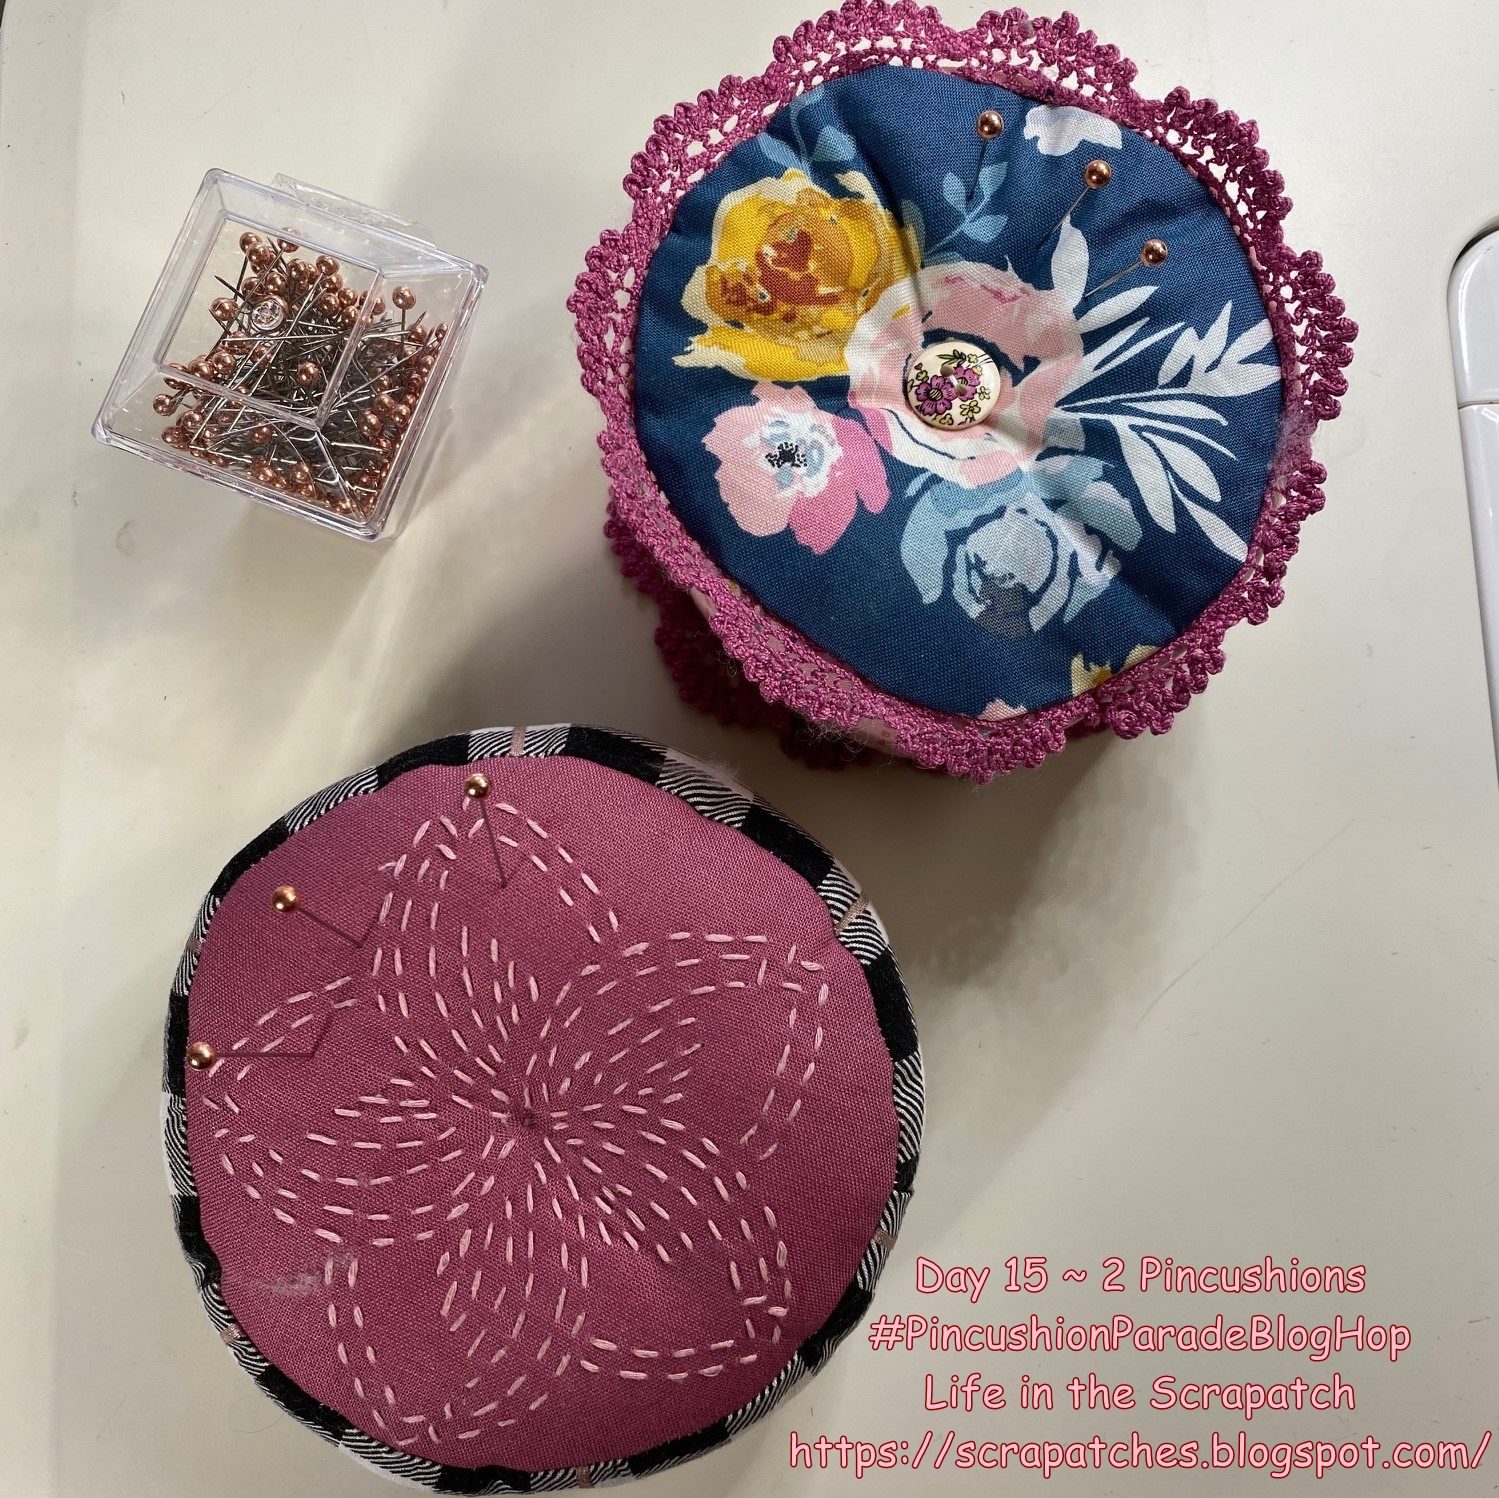
I sized this pincushion to fit into my magnetic rose gold pin dish,
which you can just see around the edge in this photo.


Here are my supplies.


Free Sakura Sashiko Pattern Template Here


Here is my Sashiko cherry blossom stitched.

I am a beginner when it comes to Sashiko.


My First Sashiko Project Is Posted Here
with the tips and tricks I have learned so far.
There are many good sites online that teach Sashiko,
much better than I ever will,
More information on that in the link above.


That said, I did hand draw this Cherry Blossom design myself
and transferred it to the pink fabric with a white
Clover Chaco Liner Pen

I used the plain side of this
Plum Hidamari Sashiko Fabric
on which to draw my design.
I saved the pre-printed part of the panel for another project.


I find sashiko to be a very easy and relaxing form of embroidery
as it is all straight stitches.


Once my cherry blossom was stitched I started my pincushion.


I cut my circle and added a very thin layer of fusible batting to the back.


I cut the circle of my backing fabric and an over-sized 2" by 21"
strip of my plaid side fabric.
I started stitching the strip to the edge of my front piece,
right sides together,
leaving an open section at the start to close my circle later.


Here is my side sewn to the front with the open strip.


I measured, carefully cut and sewed the seam to close the strip
and then finished sewing it to the top.
This process is much like closing a binding on a quilt.


 Here is my top ready to add the back circle.


I pinned my back circle to the side strip,  right sides  together.
The red pins mark the place where I will leave this open for turning
right side out.


Then I slowly stitched around the edge.


Then I turned it right side out and smoothed the circle.


I filled this pincushion with polyfil and lavender scented crushed walnut shells.
I love the scent of lavender. This pincushion is for me.
I do not use scented filling if it is a gift unless I know for certain
my giftee is not allergic.


I hand sewed my back closed using a whip stitch.


 I tufted this pincushion with the pink Hidamari Thread that I used for
the sashiko stitching as I knew it would be visible on the front.


I added a decorative button to the back with regular thread
without sewing through to the front.


Here is the finished front with the single stitch that tufts it in the center.


To show what this pattern might look like just showcasing pretty fabrics,
I also made this second pincushion.


For this pincuishion I used the back circle in my Sashiko Pattern.
Any size circle would work for the template, even a small plate or bowl.

I cut the front and back circles and used a half of a  2.5" jelly roll strip
and a strip of lace from my stash.


To add the lace, I cut it in half lengthwise and pinned the cut edge to the right side
of my top circle. Then re-pinned to add the jelly roll strip.


I also added lace to the back of the pincushion.
To finish it I tufted the center with decorative buttons


I hope you will enjoy trying sashiko with this project.

If you prefer to just make a round pincushion with pretty fabrics,
I look forward to seeing that project, too,

I hope you enjoy making this pincushion as much as I did.

Have fun and happy sewing and blog hopping!

Saturday, June 13, 2020

Bee Happy ~ Pincushion Parade Blog Hop ~ Day 13


Here is my 
Summer Star Pincushion for the


This is a free pattern from 


Today was a day of sunshine and shadow so I chose ... 


... uplifting blue and yellow fabrics for the front ...


... and a calm blue steel grunge for the back.

I needed to seek solace in my sewing corner 
and to remind myself
that there are some things that I cannot change
but when life is broken,  I can pick up the pieces,
 sew something that makes me smile,
and go forward.


May you and yours Bee Happy today.


Friday, June 12, 2020

Pincushion Parade Paper Piecing


Here is my pincushion for Day 12 of the 


Today's pattern is a foundation paper pieced block from


who has generously made these free for personal use. 


This is Block 10 in Leila's 52 Block Patterns

I love foundation paper piecing for placing fabrics perfectly.

I have learned a few things in my foundation paper piecing journey
so I am sharing what works best for me.


Tip 1:

I like to use foundation paper for printing as I find it is easier to remove
and it does not disturb my stitches. 
This is essentially newsprint paper cut in standard printer size sheets.


Tip 2:

I use a 90/14 needle and set my stitch size smaller to 1.8.
This helps making the paper easier to remove.


Tip 3:

I use my craft light to place my fabric where I want it and I pin to hold it in place.


I do this for every piece.
For a directional fabric I make sure the lines or motif is running in the direction
that I want.

Tip 4:


I use an
Add A Quarter Ruler
to trim my seams after adding each piece,
being very careful to fold back my front so that I do not cut it in error.
I found this ruler last year and it is the best tool ever for this method.

Tip 5:


I press with a dry iron between pieces.
No steam or spray as it will warp the paper.

Tip 6: 


For corners, I fold my fabric where it will be on the stitching line
 and check to make sure my fabric will extend beyond the edges of the paper.

These tips and tricks and tools work for me and
I hope some of my readers may find this helpful.

Everything I know about quilting I have learned from other quilters online
and by trial and error in my own little corner.


For the back of this pincushion, I cut a 6.5" square of pretty fabric.


I added a piece of ribbon and a button to make this pretty pincushion even prettier.

Have a Happy Pincushion Parade Day! 

 #PincushionParadeBlogHop