Showing posts with label My Tutorials. Show all posts

Saturday, November 16, 2019

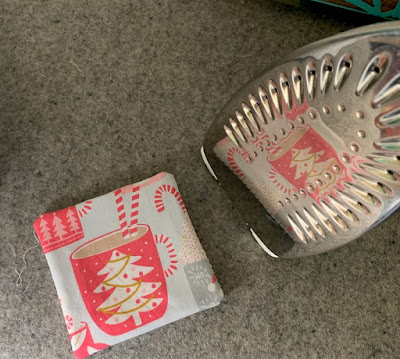
Sew Easy Gifts ~ Quick Sew Jar Openers


I took a few minutes break from quilting for a hot cup of herbal tea and honey 
and to sew two of these 
Quick Gift Jar Openers
because I needed a couple of simple gifts for friends.


5 inch squares - 1 -2 -3
I had my walking foot on my machine which is what I like to use for these
and I decided the thread for my quilt
matched the gold in the fabrics just right.


I trim these after I sew and turn and use my
Clover 2 Point Turner
to push out the pints and smooth the edge seams.


I also do a quick press on the fabric side only
before I top stitch around the edges to close the seam. 
This is one of my most popular tutorials on my blog:

Full Tutorial for 


The back of these jar openers is no-slip


easyLiner

These make good no-slip coasters, too! 

It has been a really fun blog hop week seeing all the wonderful
Stitch It and Gift It Blog Hop
that I thought I would do some more stitching and gifting posts.


Time to resume my Quilting ... Quilting ... Quilting. 
This weekend I will be quilting This Project,
which will be featured on my blog in December
with a new free pattern release from Fat Quarter Shop.

Have a Happy Quilty Weekend! 

Wednesday, May 29, 2019

How To Face A Quilt Binding ~ Tutorial


Here is my tutorial for how I faced the binding on my


The hanging tube for this quilt was  also constructed with the facing strips
that bind the quilt.


I started by squaring and trimming my quilt with the edges even.

There is no need to leave any extra batting or backing fabric when facing a quilt. 


Then I cut by my facing strips: 

Two 3.5" wide strips (sides)
and
Two 5.5 " wide strips (top and bottom) 

Length was determined by the length of the sides of my quilt plus 3"

I used the extra 108" backing fabric strips,
but any color may be used as it will not be seen on the front of the quilt.

I decided to make a hanging tube top and bottom of my quilt.
If I only wanted a hanging tube at the top I would have cut only one 5" strip 


I sewed a 1/4" seam attaching the 3.5" facing strips to either side of my quilt.
Right Sides Together

I used wonder clips to secure the pieces in every step and removed as I sewed.


Then I pressed the facing strips over the edge of the quilt
pressing toward the outside.


Then I "stay stitched" the seam by stitching a line 1/8" away from the pressed fold.
This stitching line is very important to the turning process.
You can see the 1/4 seam allowance under the presser foot if you look closely. 
This stay stitch line secures the edge.
It will not be visible on the front on the quilt as it will be turned to the back.


Then I pressed a 1/2" hem on the raw outside edge, carefully turned, pressed and clipped the facing strip as I went along.


Then I hand stitched the facing strip to the back of the quilt.
You can see the 1/4" of the quilt front turned to the back of the quilt.


Here is my first side faced.
You cannot see any binding fabric or stitches on the front of the quilt.
The outside edges of the side can be cut even with the edge and do not need to be stitched 
as this edge will be closed when attaching the top and bottom facing. 


Clip strips to the top and bottom of the quilt,
right sides together
allowing 1 1.5" overhang on either side.
This will turned under after the next step.


Sew strips to top and bottom of the quilt
leaving the overhang open.


Press the facing strip away from the front on the quilt,
pressing toward the outside edge.


Stay stitch the top and bottom 1/8" from the pressed edge
securing the strip to the seam allowance on the back.


Press a  1/4" hem and then press the overhang inward to finish the raw edges.


Machine stitch securing the overhang to the facing seam.


 Machine sew hem on tube to secure.


Secure all overhang edges in the manner.


Machine sew a 1/4" hem on the outer edge of the facing tube strip.


Turn the facing to the back.
This also turns 1/4" of the front of the quilt to the back.
Use Wonder Clips to secure.


Ready to hand stitch the facing and hanging tube to the back.

Leaving the ends of the tube open ... 


Hand stitch the hanging tube facing to the back of the quilt.

 Katniss was my quilty kitty supervisor for this process.


My finished facing.


My new wall quilt!
I really like this facing alternative to the traditional binding
as it does not add an additional design element to the quilt.

I hope you find this quilt facing tutorial useful.

If you have an questions, please contact me.
My email address may be found in my header under
"Contact Me".

Happy quilting! 

Sunday, April 19, 2015

An Airmail Envelope Pillow!


I am guest blogging again today!


For more Airmail Envelope Quilt Block fun I have made this

Airmail Envelope Pillow

to match my quilt!

I made this pillow with leftovers from my


This pillow measures 14.5" by 17.5" finished including the piping.

Materials needed to make this pillow:


TWO 6.5" unfinished  Airmail Envelope Quilt Blocks


Also needed to make this pillow cover:


SIX 7.25" right angle triangles

Cut THREE 7.25" squares
Cut each square on the diagonal once to make SIX half square triangles (HST)

I used extras from my quilt.


Layout pillow top as shown in the photo above.

Sew one HST on either side of envelope block.

Sew block strips together.

Then sew one HST to each remaining corner


Trim the ends of the triangles off to 
make a 9" by 18" rectangle


Cut TWO 3" by 18" strips for the top and bottom borders.

Sew one strip lengthwise to each 18" side of the double envelope block.


The top now measures 14" by 18"

To add piping to the edge of the pillow you will need:


TWO 1.5" by width of fabric strips

2 yards cotton piping filler cord size 2

You may find this cord HERE

Sew the two WOF strips together to make one long strip and fold in half lengthwise ...


and fold over the cotton piping cord and pin or clip around the outer edges of the pillow top.


Use your ZIPPER FOOT to stitch the piping to the top making a 1/8" seam from the cut edges.

Start your stitch line about two inches from the end of the cording on one side of the pillow
so that you leave an end to close your seam.

These stitches will be hidden by the final seam.


Ease around the corners by rounding the corners by about 1/2 to 3/4 of an inch.


Continue around all four sides and corners.


To close your seam,  stop your stitching line about three inches from
where you started sewing the piping.

Cut the cords flush and wrap ends together with a small piece of tape.

Cut the fabric leaving a one inch end to close seam.

Fold one end over by 1/4 inch to hem and fold this end over the other end of the piping.

Stitch the seam closed.


Make the back of the pillow.

One of my favorite pillow backs is an easy fold over backing that leaves an opening in the center
of the back to remove the pillow for easy washing of the pillow cover.

To make this back of the pillow:

Cut ONE 5.5" by 14" center strip

Cut TWO 11" by 14" sides


Fold one 14" edge of the side back piece over by 1/4 inch and the fold 1/4 inch again
and stitch  1/4" hem.


Sew the 5.5" strip to the other side back piece
and the fold and sew a 1/4" hem on the outside edge of the center strip.


Topstitch the other side of the center strip 1/4 inch from the side.


Here are the top and back of the pillow.

Lay these RIGHT SIDES TOGETHER

and pin or clip front to back


Using the ZIPPER FOOT sew the top to the back.

Tuck the cord snugly against the fold in the piping tube.

Lay the open side of the zipper foot as close to the cord as it will go.

Allowing a 1/4" seam to cover the stay stitching of the piping to the top,
sew all around all four sides closing the seam.

Use your fingers to keep the piping snug and ease around the rounded corners as you go.


Here is the inside of my pillow.

Turn right side out through the opening in the back.


Here is the front of my completed pillow cover.

Tuck a 12" by 16" pillow form into the opening in the back.

You may find this pillow form HERE


Here is my soft and squishy new pillow!

I hope you have enjoyed this tutorial.

As always, if you have any questions, please email me and I will do my best to clarify.

Please come back next Sunday for the


Airmail Envelope Quilt ~ Part 3 

@


I will have some more envelope block fun for you here on my blog next week, too!

Enjoy!

~ <3 ~