Katitude Block
12 and 1/2" " Square
This is my first time using these "alphabities"
to help keep the pieces organized, so I am still learning.
to help keep the pieces organized, so I am still learning.
Maestro thought they were new cat toys.
and re-arranged them for me.
Cutting:
Focus Fabric (Cat Body and Tail)
A ~ 8 and 1/2" by 4 and 1/2"
B ~ 6 and 1/2" by 5 and 1/2"
C ~ 10 and 1/2" by 1 and 3/4"
D ~ 3" by 1 and 3/4"
E ~ 2 and 1/2" by 6"
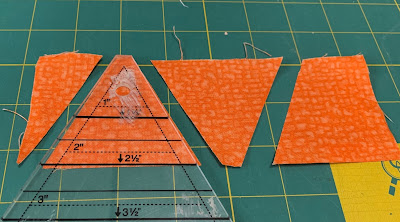
C E into 2 triangles for ears
I use the
EZ TRi Tool Ruler
(affiliate link)
Usually available at any place that sells quilting rulers.
Any "triangle in a square" ruler should work
as long as you cut your strips 2.5"
(affiliate link)
Usually available at any place that sells quilting rulers.
Any "triangle in a square" ruler should work
as long as you cut your strips 2.5"
Background Fabric
F ~ 2 and/1/2" by 6"
G ~ 8" by 5 and 1/2"
H ~ 3" by 1 and 3/4"
I and J ~ 12 and 1/2" by 1 and 3/4"
K and L ~ 10 and 1/2" by 1 and 3/4"
Cut F into setting pieces
I use the
(affiliate link)
Sewing the block:
Ear pieces E and F
Sew setting pieces to one side of each ear piece,
by aligning the seam as shown,
to make the 1/4 inch seam.
(There is a video in the ruler link showing
how to sew these angled pieces. )
I pressed all seams open on this block.
Ear Pieces
Align and sew together.
Trim to 2 and 1/2" by 4 and 1/2"
Ear Head Body piecces.
Sew ears to top of head/body section (c)
Back Body pieces B and G
Tail pieces D, H and L
Sew and flip one L square onto each corner
of one end of tail piece D
by drawing a line and sewing along the line
and cutting away corner.
Tail sections H and D
Sew tail sections H and D together as shown.
Back body pieces B and D
Right sides together, align background section G
perpendicularly to top right corner Body Section B,
as shown,
and draw a line,
then sew along line
the cut 1/4" away from seam line
as you would for a snowball block.
Head, Body and tail section C
Sew these sections together
and press seams open
The center of your block will measure 10 and 1/2" square.
Add the block border strips,
sewing top I and bottom L first and then adding
sides J and K.
Press all seams open.
These strips may be slightly wide.
Strips could have been cut 1 and 1/2" wide.
I like to allow room to square and
trim the block to 12 and 1/2"
I designed this block with the border strips as it is made for a swap
and I like my swap blocks to be easily trimmed to size
to play nice with the other blocks.
If you sew a block from this tutorial
I would love to hear your feedback.

My quirky, quilty kitty Nutmeg,
chasing sunspots in this photo,
with her swishy tail
is the inspiration for this block.
Happy Sewing!


3 comments:
Thank you for the tutorial. Can I use a triangle ruler that is different than the one you mentioned? I wasn't sure what the letters meant at first, but I finally figured it out.
Hi, Susan, any "triangle in a square" type ruler should work as long as you cut your strips 2.5" ... :-) Pat
My eyes played a trick on me when I first looked at your cat block. I saw the cats on the background fabric and not the orange cat that was the central part of the block. I like your block.
Post a Comment